My First Custom-Made Journal

Soon after I ‘opened’ my online shop, my lovely friend, Jennifer, asked if I’d make a journal for her husband’s birthday.
She wanted it to be personal to him, to highlight his love of steam trains, and she sent me a selection of photos he’s taken over the years.
She left the design and layout to me, her only requirement – lots of ‘pockets’ and tuck-spots to store tickets and leaflets.
Instead of making the journal from scratch, like the ones I have in the shop, I decided to use an existing book, which I’ve done before.

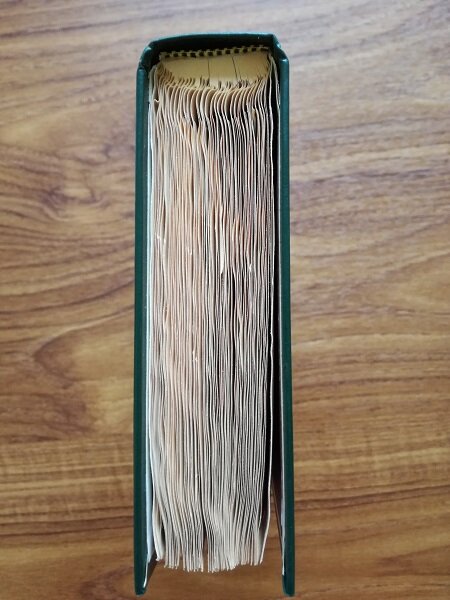
The book ready to be prepped. It’s actually a deeper bottle-green than this.
As awful as this sounds, it does require removing pages from the book. When I first started making altered books, I struggled to tear pages out of books. I can’t remember where I read it, but someone said, it’s not a case of destroying the book but a way of giving an unwanted book a new lease of life.
Hardbacks work best as there’s already a sturdy base to work on. But not all hardbacks; it depends how the pages are attached to the spine. The best ones are where each page is attached to what looks like a piece of fabric, with a gap between the fabric spine and the spine of the book as you can see here. This is after I tore the pages out.
Showing how the pages are attached to the fabric, which is attached to the book. And showing how the book maintains its integrity when the pages are torn out, not cut.
I used to cut the pages out until I came across ‘Craftyirina’s YouTube channel. Her method is to tear the pages out, not cut them, as this doesn’t interfere with the integrity of the book.
Following her method, she usually tears out 8 pages, leaves 2, tears out another 8, leaves 2 and so on. The number of pages that are torn out depends on the overall number of pages in the book and how ‘fat’ you want the journal to look when it’s filled up.
When the 2 pages – one either side of the torn-out pages – are glued together, that seals and hides the torn edges. Hope that makes sense; this video explains her method.
Whereas I used to slather on the glue over the entire page, she recommends running a line of glue just around the edge of the page, not covering the whole page; she demonstrates her technique in this video.
Before gluing, some planning is required if you want some of those pages to double up as pockets. Once you’ve decided which ones are to be pockets, and whether they’re to open on the side or top of the page, make sure you don’t apply glue to the side that opens.
Instead of covering the pages with patterned paper, I decided to digitally overlay the photos onto patterned paper using a photo-editing tool (I use Pixlr), print them out and glue them to the pages.
Unfortunately, the print sizes for my printer don’t conveniently match up with the pages of the book so extra cutting and trimming was required.
Note to self – next time, cover the pages with patterned paper then add photos and embellishments.
The cover features a photo of one of Jennifer’s hubby’s favourite art prints. The little squares above and below that image are only there for the purpose of this post, to hide his initials.

A strip of cardstock with railway-related wording covers the book title on the spine.

I took inspiration from ‘Craftyirina’ for the closure – hair-tie covered elastic threaded through a hole punched in the back cover and secured around a brad (split pin) attached to the front cover. Simple yet effective.

The inside front cover has a pocket to hold notecards. The little half-circle on the left edge covers the ‘legs’ of the split pin.


The first pages of the journal
Most of the pages on the right-hand side of the book, I covered with lined paper.
Apart from tuck spots, there are 9 pockets (if I remember correctly), which all open at the top of the page, and these have tabs with railway-inspired words.

There are also 3 envelopes dotted throughout the book for tickets.

The journal cards are resized images of the photos Jennifer had sent me. The ones that feature the family have been turned to show the plain, white back.


Double tuck spots to hold journal paper; the other side of the page has the same double tuck spots.
I had such fun making this journal, more so than the usual ones I make. I don’t know if it’s because it’s bespoke.
I do know that I’ll be offering bespoke journals if the interest is there.
If you’d like to know more, please get in touch via the ‘Contact’ page.